
Next select the Services Tab.

In order to make life easier for me and other people to connect to your machine on the internet there is a service called Dynamic DNS that will provide you with a unique hostname on the internet such as helpmehelpyou.homedns.org which is a lot easier to remember than 195.192.67.124
First of all you need to sign up for an account with dynamic dns at http://www.dyndns.org/account/create.html This will enable me (and others) to see your machine on the internet by a fixed name. Rather than having to remember or find out your ip address I can just connect to an address such as http://youraccount.dyndns.org
Sign up at http://www.dyndns.org/account/create.html. Shortly after signing up you will receive an email with authentication instructions. Click on the link to prove you requested this information and you will be thanked for joining and then prompted to login.
Login with the username and password you just created at the web site (you can also access this page at https://www.dyndns.org/account/login.html )
Once logged in select the preferences icon and change your timezone as appropriate and hit save.
Next select the Services Tab.
Select Dynamic DNS from the menu on the left hand side and then click “Add a Host”. Note that if your ip address does not change (ie your internet provider has told you that you are using a static ip address) then you need to select the static DNS option – everything else is the same.
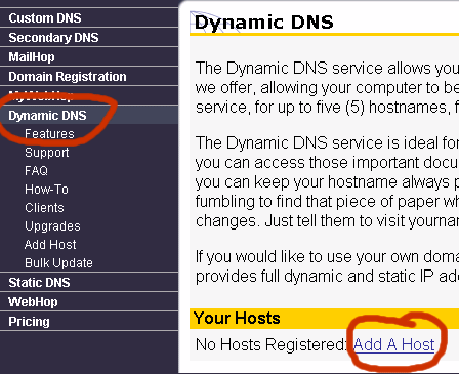
Enter a hostname in the field as appropriate and select a domain name from the drop down box. The hostname can be anything you like and would normally be something like your company name or a description of your machine on the internet. The combination of your hostname and the domain name will provide the unique name used to identify your machine on the internet. Make it easy to remember but choose something that someone else has not already chosen.Here I have chosen helpmehelpyou and homedns.org. The IP Address will automatically be filled in for you. Leave everything else as it is and click Add Host.

You have now completed the first step of setting up a name for your pc. You can test this by dropping to a Command Prompt on your machine (normally start button/Run and type in command (if you are running Windows 95/98 or cmd if you are not running Windows 95/98). Then type in ping helpmehelpyou.homedns.org and hit return. Obviously you will need to change this to your name you chose. You should then get a screen looking something like the one below. The important bit is the Reply from bit. If you do not see a reply then something else has gone wrong (and is beyond the scope of this document).

This all works great but you would need to go through a similar step to update the dyndns.org website everytime your internet address changed which is normally whenever you dial up to the internet. However by using one of the many clients available at http://www.dyndns.org/services/dyndns/clients.html you can make this happen automatically. I recommend Kana Solutions DynDNS Updater as I use it myself, is free and I know it works. Download the DynDNS Updater with setup program from http://www.kana.homeip.net/download.php, unzip it and run the setup program. Answer the standard installation prompts and select the option to launch DynDNS Updater.

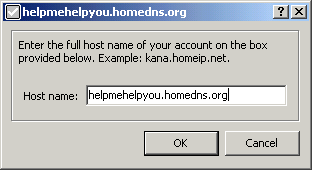
Hopefully this program won't give you errors (it is on mine at the moment). But follow these steps to configure it.Right click on the icon in the taskbar at the bottom right of your screen that looks like a grey tick.Select Settings and then select Add to add an account. The name can be anything but I suggest you use the same as your userid. Enter the userid and password (that you signed up with initally). Leave Type as dynamic and then click add to add the hostname, this will be the specific name we chose – in my case helpmehelpyou.home again. Note that this is the full name including the domain name.
Click ok to add this to your list of hosts (you are allowed 5 on a free account with dyndns). The dialog box will now look like the following.

Click ok. Click on the connections tab and if you use a modem to connect to the internet then select dialup, however if your machine is on the lan then use LAN.Select the Dial tab and ensure that “dial when no connection is detected” is NOT ticked.Select the IP address tab and select “Detect ip address automatically” and finally click ok. Right click on the tick in the taskbar and choose “Show Main Window”. Select the Options tab and tick the “start with Windows” checkbox.Click on ok and that should be it. Whenever you are online your ip address will be adjusted automatically so everyone will be able to access you at helpmehelpyou.homedns.org